Architectural Quilling - New York City Skyline
A few years ago I met Allison Patrick via the message board of a New York musician whose songs we both like. We began emailing and soon were talking about our other interests. Allie had tried just about every craft imaginable while growing up... ah, except for quilling. I must have talked it up pretty well because in a matter of days she was experimenting with rolling paper around the tip of needle nose pliers and an open paper clip - that's determination!
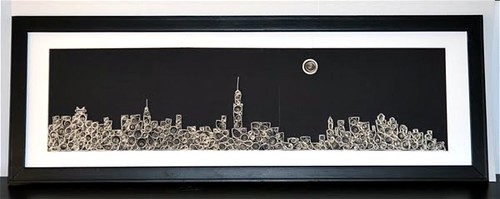
When she mentioned she was moving to a new apartment and needed wall art, I remember jokingly telling her she would have to quill something... before I knew it, she was immersed in making this:

Allie explained that she created a line drawing in AutoCAD, printed it out, and attached it to foam core board. Next she wrapped outline pieces around pins that were placed in each corner, and lastly filled in the center.

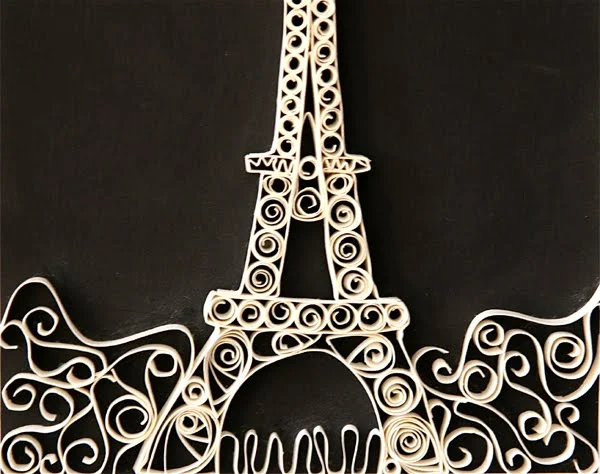
She went on to do the Eiffel Tower and Seattle's space needle and framed the trio inexpensively, but effectively, with black-painted canvas stretchers.

Now Allie is a busy Columbia architecture student with little time to quill, but over the summer she co-developed Zipper8Design, a line of environmentally friendly, bamboo resin products. I'm looking forward to seeing where her creative mind takes her next!
[Edited to say Allie's new shop is Aster + Quail and she blogs about her latest designs at The 3 Rs.]

On another note, my mother had a serious accident last week. I'm not able to blog as often as I would like right now, but please keep checking back. I have lots more projects, artists, and crafters I'm excited about featuring... meanwhile, thank you for your patience.
When she mentioned she was moving to a new apartment and needed wall art, I remember jokingly telling her she would have to quill something... before I knew it, she was immersed in making this:
What a great concept! By simply rolling a variety of shapes and gluing them into position on matboard, there's no denying that even as a beginner, she'd done an admirable job of quilling the New York City skyline.

Allie explained that she created a line drawing in AutoCAD, printed it out, and attached it to foam core board. Next she wrapped outline pieces around pins that were placed in each corner, and lastly filled in the center.

She went on to do the Eiffel Tower and Seattle's space needle and framed the trio inexpensively, but effectively, with black-painted canvas stretchers.

Now Allie is a busy Columbia architecture student with little time to quill, but over the summer she co-developed Zipper8Design, a line of environmentally friendly, bamboo resin products. I'm looking forward to seeing where her creative mind takes her next!
[Edited to say Allie's new shop is Aster + Quail and she blogs about her latest designs at The 3 Rs.]

On another note, my mother had a serious accident last week. I'm not able to blog as often as I would like right now, but please keep checking back. I have lots more projects, artists, and crafters I'm excited about featuring... meanwhile, thank you for your patience.


I am in love with this idea. Have already decided to do the Eiffel Tower for my daughter for Christmas and since I live only two hours from Toronto, I am going to make a CN Tower for our home. Going to brainstorm some other ideas for other gifts..I can see getting lots of mileage out of this idea! Btw, my mom, daughter and I were in a bad car accident 11 years ago. Praying for your mom!
ReplyDeleteAnn thanks again for posting about this! With school I don't have much time for quilling but one of these days I will get back to it, and maybe then I can try putting quilling into some of my coasters and trivets as we've discussed! :-)
ReplyDeleteAllie
http://zipper8design.blogspot.com
Ann, thank you for sharing such wonderful quilling artists. I love the striking black and white designs! Even though she is just starting, I'm sure she will create even more stunning quilling projects as she develops her gift for quilling!!! I will pray for your mother in her recovery and for your strength and peace in caring for her!
ReplyDeletewow theyre so cool! i must have a try, they look really good on that wall dont they? :)
ReplyDeletestoleninspiration.blogspot.com
There must be huge talent here - these are fabulous and look so great in their frames. Wonderful gift idea if you use a local skyline.
ReplyDeleteHope your Mum makes a speedy recovery Ann.
Thanks so much for your comments and concern. Mom is slowly improving.
ReplyDeleteI have GOT to learn how to do that New York City one!!! That is a perfect gift for my friend. Any tips or pointers?
ReplyDeleteWell, the way I did it was I drew out a skyline that I wanted to quill. Personally I did it on the computer, because I was working at an architecture firm at the time, but you could just draw it out by hand.
ReplyDeleteThen I used double thick strips to march around the border. I used straight pins in the corners to fold around. Then I just started making shapes, and filling in the center!
Glue it on black paper, and you are ready to go!
Good luck!!
Allison
http://zipper8design.etsy.com